
You may be wondering what happened next with our boat engine rebuild. In the last blog we’d had the engine lifted back into the boat and we’d given it a test run. It hadn’t gone well. It had started, which was excellent, but the revs were out of control. We were able to stop it, but the situation wasn’t good.
Once our emotions had settled, we’d taken a look at the engine and saw that the stop lever was in the wrong position. We suspected that a tangle between the engine stop lever and the throttle control was the problem. But, were we able to untangle the levers? And if so, did the engine start and run correctly? Plus why do we feel like we’ve caught a dose of the commentator’s curse?
Taking The Timing Case Off Again
We’d tried to untangle the levers without taking the timing case off, but there just wasn’t enough access space. So, off it came, for the third time.
Taking the timing case off was not a straightforward job because of all the other engine components that are fitted around it and which also had to be removed.
First, we removed the fuel linkage pipe and the high pressure fuel pump. Every time we do this, we’re afraid this delicate pipe will break. Our next issue was how to remove the crankshaft pulley and nut, which was tightened to 300nm. How would we release this force in the confined space of the engine room? The last time we’d removed it we’d been in the shed and we’d had to take the oil sump off too. To do that now would mean we’d have to lift the engine again, and that was a big no. So, we needed an alternative method.
YouTube came to the rescue again!
There is a technique where you place an old fanbelt backwards around the pulley. Then as you turn the pulley it tightens and locks against itself. Another turn on the pulley and the pressure on the nut released. Magic! After that, Colin was able to remove the nut and pulley himself.
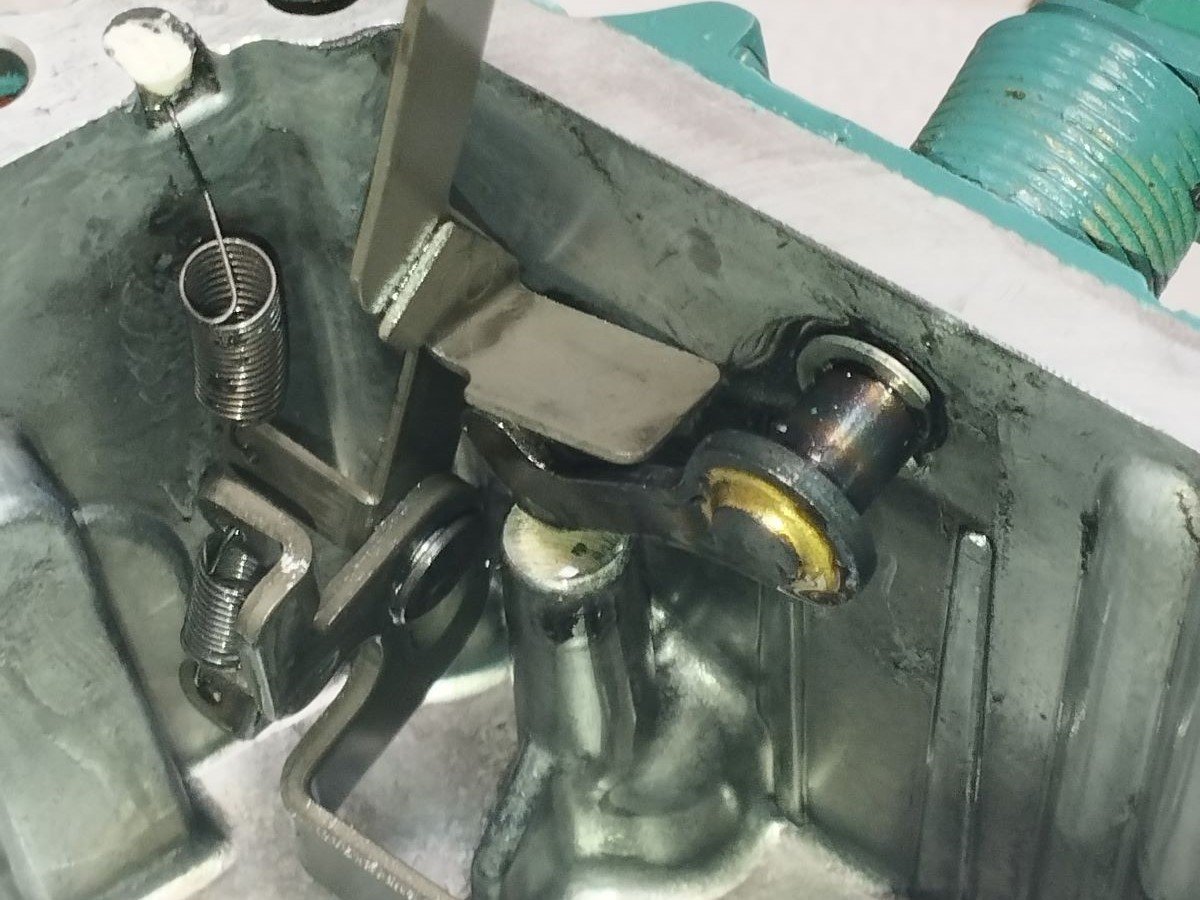
The Tangled Levers
With the timing case off and in our hands, it was immediately obvious that we’d been right. The stop lever was trapped under throttle control, pushing it into a position that resulted in the high revs. It took just a minute to gently untangle them and have them moving freely again.
Luckily we had a spare timing case gasket onboard which we bedded down with some Hylomar Blue gasket sealant. Belts and braces after our previous gasket woes. Once back in place, we double checked that the stop lever was now sitting where it should be.


The Second Test Run
We’d been so nervous before the first engine test, that we’d felt nauseous. But we were feeling a little more confident about the second test run. We still had nerves, but these were tempered by knowing that the engine would start and that we’d correctly diagnosed and fixed the over-revving problem.
We turned the ignition key and the engine fired into life, with the revs as expected as set by the cockpit throttle control. Then, a few seconds later, we heard and saw water being ejected out of the exhaust. What a relief.
We ran through some test scenarios, such as increasing the revs and keeping them there for a few minutes. Unfortunately we couldn’t run the engine for too long as the yard water supply couldn’t keep up with keeping the water level topped up in the cooling water bucket.
We also tested using forward and reverse gear without the prop shaft attached. The prop shaft needs water for cooling, we would have destroyed the cutlass bearings if we’d spun the propeller at speed whilst out of the water.
The engine passed all our tests. We felt hugely proud and very amazed that we were at this point after everything we’d been though. We’re not completely in the clear yet as we have further tests and running in to do, but we need to be back in the water to do those.
The Leaking Water Pump
Running the engine meant that oil was thrown around the inside of the engine and water ran through its cooling pipes. So, we were on the lookout for leaks during the hours after the test. It was reassuring to see the engine bilge remained a bright white from its recent coat of paint. However, Colin noticed a greenish crust around a bolt on the new fresh water pump. The leak seemed to be coming from between a seal which was part of the pump unit itself, rather than from between the pump and where it seals to the engine.
We took the pump off and saw there was damage to the gasket between the pump body and the backing plate. It came as a sealed unit, so this must have happened during manufacture and assembly. So we put it back together, but with a good layer of gasket sealant. There is still a very slight weep, so this is something we’ll need to keep an eye on.

The Last Few Jobs
We had a number of jobs on our list that we couldn’t complete until we knew that the engine was working. Most of which involved rebuilding what we’d taken apart to get the engine in and out.
The prop shaft needed reconnecting to the gearbox, with its refurbished prop shaft seal (PSS). It had a new bellows as the old one had split and we’d had the mating surfaces of the seal polished to give them a new lease of life. It’s great that we were able to buy just a replacement for the failed bellows, rather than a whole new PSS unit.


The engine lifts out through the cockpit floor, so we’d had to take the helm apart. It needed rebuilding along with its instrumentation, wiring and reattaching the steering cables. Finally, the engine room lights went back up.
Of course not everything went smoothly but after a couple of weeks we only had the Coppercoat repair left to do. We’d been so confident of an imminent escape back to sea, that we’d even used a light wind day to put the sails back on.


The Commentator’s Curse
For those who don’t know, the commentator’s curse goes something like this:
During a sport event, a commentator states that one team is going to win or they praise the skills of a player. Soon after this, something goes wrong for that team or player. Murray Walker was famous for it in the UK, when commentating on Formula One races.
We felt struck down with a similar curse when it came to leaving the boatyard. During the spring, people had begun asking us when we would be finished with the engine work. But every time we suggested a date, something else went wrong. Eventually, by mid-May, we were very close to completing the engine rebuild. People asked again when we might leave; we suggested the end of June and even talked about a summer trip to the Azores. But then the problems with the leaking oil sump had occurred, and we’d had to order a new sump gasket. May passed and half of June before it arrived.
It seemed as if every time we proposed a launch date, another unexpected problem occurred. So, we started being vague in an attempt to beat the curse.
Perhaps the vagueness worked, because by August, we had an engine that started and ran. However, I let my guard down and the curse struck again. I was in the marina office and the manager asked if we knew when we’d be ready to launch. I tentatively suggested two weeks, but that I would confirm this. It seemed like a good prediction with only one small engine task to complete, to repair the Coppercoat and to clean and store.
The Iffy Seacock
The one task connected with the engine was to reconnect the seawater intake hose to its seacock. When the engine runs, it pulls in seawater via this hose to use for cooling. On the hard, we had to provide an alternative source of this cooling water. So, while running the tests, we’d placed the intake hose into a water filled bucket. We’d since kept the hose unattached in case we wanted to do another engine test. With a potential launch in the air, we successfully started and ran the engine again, so now we could reconnect the hose. However, as Colin was doing this, something caught his eye on the seacock ball valve. Shining a torch down revealed significant scratches on the valve.
It turned out the seacock we bought was not what we’d thought we were buying. Rather than being fully bronze, the ball valve is actually CW617N brass with a chrome coating. CW617N brass is an alloy that is susceptible to a type of corrosion called dezincification in seawater. The chrome coating on ours was scratched, which would leave the brass exposed to seawater. Also, there are issues with having three dissimilar metals – chrome, brass and bronze – in seawater. So the valve had a potential to corrode and fail sooner than it should.
All seacocks are important, but the engine water intake seacock is a particularly important one to have working correctly. If it failed and we couldn’t close it, we wouldn’t be able to service or repair the engine or clear blockages from the seawater strainer.

More Decisions
We had a decision to make – either to live with the damaged seacock or to replace it now. On the one hand, the valve could last a few more years, on the other, it could fail much sooner. But if we kept it, it would always be on our mind and at some point we would have to lift Emerald out to replace it. We know full well that boat problems can happen anytime or anywhere, but we’d prefer to choose the time and location of the next boatyard visit. So it seemed daft to us to sail away with a damaged seacock that we knew was an issue in waiting, especially when we had the opportunity to do something about it.
If we were in a place where we could receive replacement parts within a couple of days, it would have been a no brainer. However, in Porto Santo, delivery times are an unknown quantity. It could take two weeks, it could be six. So our decision was going to add another delay to our escape plan.
Better to be Safe Than Sorry
Maybe we were being overly paranoid, but we decided to replace the seacock and 3 others. It is better to be safe than sorry especially when it comes to keeping our floating home safe.
We ordered TruDesign nylon reinforced seacocks and their associated parts, hoping for a quick delivery. In the meantime, we serviced and repaired our hydraulic autopilot.

The Social Media Bit: Want to Follow Us?
Thank you for reading this far, we really appreciate it. If you’ve enjoyed our site or found it useful, please consider a donation via the DONATE button below. We’re grateful for anything you can spare!
If you’d like to follow us on other social media platforms (Facebook, Instagram and YouTube), you can do so by using these links:
Or use the link below to track our voyage on NoForeignLand.com.
And finally, you can sign up to receive email notifications of new blogs using the subscribe box at the bottom of this page.
Thank you from Nichola & Colin